ethos
![]()
Friendshipper
Friendshipper is a desktop application for managing Unreal Engine project source control through Git.
- Uses longtail to download builds of the game client.
- Interacts with f11r-operator to create game servers and facilitate playtests.
- Git repo management with a corresponding Unreal plugin.
Architecture
Friendshipper is built as a single static executable. We use Tauri for UI, which is a framework for writing Rust apps with a web-stack frontend. We use Svelte in the frontend.
flowchart LR
	subgraph "Local PC"
		direction LR
		UE["Unreal Editor"] -- HTTP RPC <--> Friendshipper["friendshipper"]
		Friendshipper -. spawns .-> Client
		Friendshipper -- via Git --> LFS["LFS Server"]
		Friendshipper -- via Git --> GitHub
		Friendshipper -- via GraphQL --> GitHub
		Friendshipper -- via Longtail --> S3
	end
	subgraph "AWS"
		direction LR
		subgraph "Kubernetes Cluster"
		direction LR
       		Friendshipper ---> GC["Game Controller"]
       		GC -. spawns .-> GS["Game Server"]
        	end
	end
    Client -- UDP --> GS
    style Friendshipper fill:green
Code Organization
There are a few internal libs that are built into friendshipper:
friendshipper/- the Friendshipper UI and backendbirdie- A PoC art pipeline toolcore/: Code shared between various applications
Development
Prerequisites
Friendshipper uses several pieces of tech that you’ll need to have before beginning development. These instructions assume you’re using Windows.
Install Rust
rustup is the Rust language toolchain updater. It primarily manages rustc, the compiler, and cargo, the build
system and package manager. You can install it from this webpage:
https://www.rust-lang.org/tools/install
Or directly from this link:
https://static.rust-lang.org/rustup/dist/x86_64-pc-windows-msvc/rustup-init.exe
After installing, ensure the installation directory cargo\bin is on your PATH. You can ensure it’s working if you can
run rustup from a terminal.
Run this command to make sure you have the latest version of the tools: rustup update
Install Node.js
You can download the installer from this page: https://nodejs.org/en/download
Or directly from this link: https://nodejs.org/dist/v20.9.0/node-v20.9.0-x64.msi
Install Yarn
We use yarn to manage the javascript packages used in the web frontend. Run this command to install it:
npm install -g yarn
First Time Build
For the first run, you’ll need to download core packages as well as friendshipper ones:
pushd core/ui
yarn
popd
pushd friendshipper
yarn
Build and Run
To run the app, simply:
cd friendshipper
yarn tauri:dev
You should see cargo build a bunch of packages, and once the rust build is finished, some output like this in the
terminal:
D:\repos\ethos\friendshipper> yarn tauri:dev
yarn run v1.22.19
warning ..\..\package.json: No license field
$ tauri dev
     Running BeforeDevCommand (`yarn dev`)
warning ..\..\package.json: No license field
$ vite dev

  VITE v4.5.0  ready in 538 ms

  ➜  Local:   http://localhost:5173/
  ➜  Network: use --host to expose
Eventually the main UI window will appear, and you should be able to use Friendshipper as normal.
Hot-reloading
Our project is set up to take advantage of Tauri’s hot-reloading feature. When saving changes to:
- Rust code: The application will automatically be killed, rebuilt, and launched
- Frontend (web UI): Tauri will reload the page in-place, making it very fast to iterate on UI.
Note that if you make changes to frontend components in core/ui/, you need to run yarn in the same directory to
rebuild the shared components, and restart the app you’re developing so it picks up the changes.
Getting ready for commit
We leverage an autoformatter to simplify avoid bikeshedding over formatting. You’ll need to run these two commands before checking in.
yarn format
yarn lint
Release Process
We use GitHub to distribute new releases of Friendshipper, according to the semantic versioning scheme. Friendshipper will look at GitHub releases and notify the user when a new version is available to auto-update. To do this, we’ll need to tag a release and make a new release in GitHub.
In this example, we’ll make a new release for v4.0.0.
Update config files
Run the Update App Version workflow in
GitHub Actions, specifying 4.0.0 as the version. This workflow will automatically open a Pull Request that updates all
the files that need to be modified with the new version number. Make sure this Pull Request is approved, then merge it.
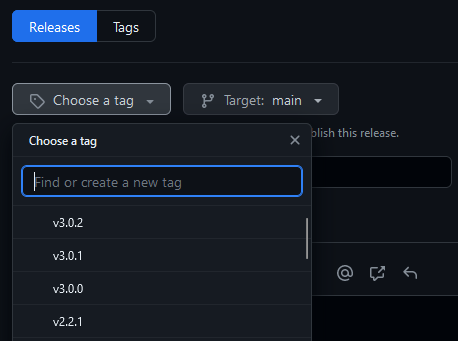
Draft and publish release in GitHub
Navigate to the releases page:
https://github.com/believer-oss/ethos/releases
Select Draft a new release

Choose the tag you just pushed up:
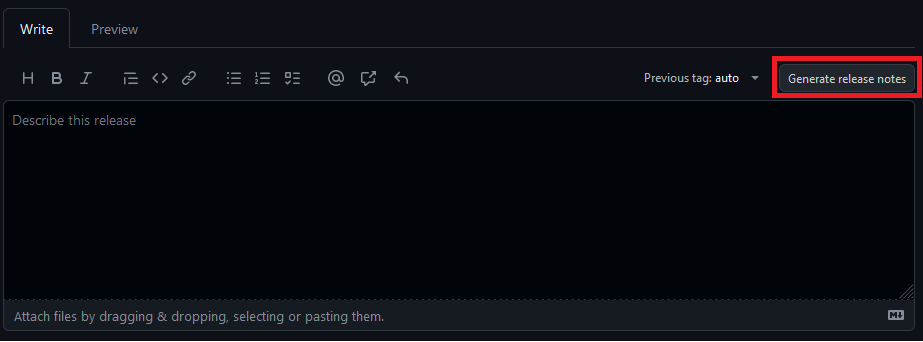
Then select Generate release notes. Github will fill in the title and release notes with all commit titles since the
last release. This is usually all we do for release notes - hopefully the commit notes are good enough. :)
Finally, all that’s left to do is publish the release.
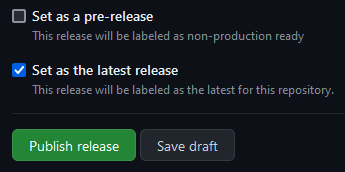
Our GitHub CI will automatically associate the appropriate files with the relesae, so all you’ll need to do is wait until the files appear in the Assets list.